
How to Grow Autoflowers: A Beginner's Guide to Your First Harvest
A step-by-step beginner's guide to growing autoflowering cannabis: genetics, pots, light, watering, feeding and harvest, with a simple 10-week plan.
By Autoflower.net Editorial Team · Last reviewed 2026-10-13
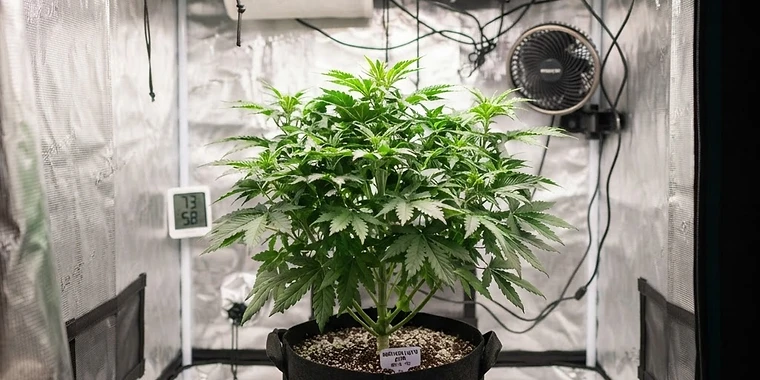
Autoflowers flower by age, not by daylight. Give a healthy plant 18 to 20 hours of decent light, a 3 to 5 gallon pot of well-draining medium, light feeding and steady warmth, and most autos will carry you from seed to harvest in about 8 to 12 weeks. This guide walks through each step of a first grow in that order.
If you want the full week-by-week breakdown with feeding and training cues, the complete seed-to-harvest autoflower guide goes deeper. This page is the beginner-level version: what to do, in what order, and where new growers most often go wrong.
Why autos suit a first grow
Traditional (photoperiod) cannabis plants start flowering only when their day length drops to about 12 hours. Autoflowering genetics, bred with Cannabis ruderalis heritage, flower after a set number of weeks regardless of the light cycle. That changes the beginner experience in three practical ways:
- No timer mistakes. There is no 12/12 flip to get wrong, and a light left on for an extra hour will not push a plant back into veg.
- Small, fast, discreet. Most autos finish at knee-to-waist height, which suits balconies, closets and small tents.
- Forbearing budgets. A single 150 W to 300 W full-spectrum LED panel is enough for one or two plants.
The trade-off: an auto's vegetative window is fixed at roughly 3 to 5 weeks. You cannot extend veg to recover from stress or to fill out a training plan, so everything in the first month has to go gently. As breeder Mephisto Genetics notes in its week-by-week growth guide, the vegetative stage is short and the plant essentially follows its own schedule.
Step 1: Start with forgiving genetics
Choose a strain labelled beginner-friendly or easy: fast flowering (9 to 10 weeks), compact height and a mostly indica or hybrid structure. In our strain database you can filter by difficulty. Good examples include Northern Lights Auto and Auto Duck. See our picks of the best autoflower seeds for beginners for a full comparison.
Step 2: Get the pot and medium right
- Pot: 3 to 5 gallon (11 to 19 L) fabric pot, planted directly into its final pot. Transplanting costs autos days they cannot spare.
- Medium: a light, well-aerated soil or a soil-coco mix with perlite. Heavy, waterlogged mix is the number one seedling killer. If you want to go the organic route, our living soil guide explains a low-feeding approach that works well with autos.
- Drainage: lift the pot. It should feel noticeably lighter between waterings.
Step 3: Germinate the seed and plant it
Germination is simple but easy to overcomplicate. The paper towel method, a plain water soak, or planting straight into moist soil all work; our guide to germinating autoflower seeds compares the three. Whichever you choose, handle the white taproot by the seed shell, plant it about 0.5 cm deep, and keep the medium moist but never saturated for the first week.
Step 4: Set the light from day one
Autos do not need a schedule change, so pick a light cycle on day one and leave it alone. 18/6 (18 hours light, 6 dark) is the default recommendation for most home growers: strong growth with a modest power bill. 20/4 can push slightly faster growth, and 24/0 works but raises electricity cost for a small gain. See our autoflower light schedule comparison for the trade-offs in detail.
Light strength matters more than the schedule. Keep a basic LED panel 30 to 45 cm above the plant through veg, and raise it slightly during flowering if leaves start to bleach.
Step 5: Water less than you think
Most first autos are killed by kindness. Water in a thin circle around the seedling, then wait until the top few centimetres of soil are dry and the pot feels light. A 5 gallon plant in week 3 might only need watering every 3 to 4 days. Use pH-balanced water (roughly 6.0 to 6.5 in soil) so the roots can actually absorb what is in the medium. Our watering and pH fundamentals guide covers the lift-the-pot habit that prevents most problems.
Step 6: Feed lightly, late
If your soil is pre-fertilised, you may not need to feed at all until pre-flowering around week 4. If your medium is plain, start at one quarter of the bottle's recommended dose and climb slowly. Autos use less nitrogen than a feeding chart suggests, and burn is far easier to cause than deficiency is to fix. Our nutrient plan for autoflowers lays out a week-by-week schedule.
Step 7: Train lightly, if at all
Because the clock cannot be extended, aggressive training is a gamble. Low-stress training (bending the main stem sideways and tying it, opening the lower branches to light) is the safe option and pairs well with a 3 to 4 week start. Avoid topping: the plant spends its short veg window healing instead of growing. Full reasoning is in our low-stress training guide.
Step 8: Watch flowering take off
Between weeks 3 and 5, white pistils appear at the branch tips and the plant may stretch. From there the flower phase runs roughly 5 to 7 more weeks. Shift feeding toward higher phosphorus and potassium, lower humidity toward 45 percent if you can, and resist heavy defoliation late in flower. Details are in our autoflower flowering stages guide.
Step 9: Harvest by trichomes, not by date
The breeder's week number is a suggestion. From about week 8, check trichomes with a cheap 30x to 60x jeweller's loupe: mostly milky with a minority amber is the common target for a balanced effect. Our trichome guide explains when to harvest, and drying and curing are covered in the drying room blueprint and curing guide. Those last two steps decide half your final quality, so budget a week for drying and at least two for curing.
What a realistic first grow looks like
A typical first indoor auto, grown in a 3 to 5 gallon fabric pot under one LED panel, lands somewhere around 1 to 5 ounces (28 to 140 g) of dried flower per plant based on community reports from growers on r/Autoflowers and THCFarmer. Speeds vary by strain: 9-week autos like Gorilla Glue Auto often run to 10 or 11 in practice; see our breakdown of how long autoflowers really take.
Common first-grow mistakes
- Overwatering seedlings - the most common failure, and the one that most often kills a plant outright.
- Starting nutrients too strong or too early - quarter strength beats half strength almost every time.
- Too little light - a leggy, sparse plant almost always traces back to weak or distant lighting.
- Transplanting - costs vigour the auto cannot repay.
- Harvesting on the breeder's date - trichomes, not calendars, decide ripeness.
Every one of these has a longer fix-it guide in our troubleshooting library, and our Plant Doctor tool will diagnose a photo of a struggling plant if something looks off mid-grow.
Frequently asked questions
Are autoflowers good for beginners?+
Yes, for most first-timers. Autoflowers flower by age rather than daylight, so there is no lighting timer to manage and no risk of accidental revegetation. The trade-off is that you cannot correct early mistakes with a longer vegetative period, so gentle handling early matters more.
How big a pot should I use for an autoflower?+
For most indoor autos, a 3 to 5 gallon (11 to 19 L) fabric pot is the common sweet spot reported by growers. Bigger pots can mean bigger plants but more watering complexity. Plant the germinated seed directly in its final pot so the taproot is never disturbed.
Should I top or FIM my autoflower?+
Most experienced growers recommend against topping autos, because the recovery time costs more than it gains on such a short clock. Low-stress training (bending stems sideways and tying them) achieves a similar canopy without the setback.
Can I grow autoflowers in a windowsill?+
A seed may survive, but bud quality and yield will be poor in most climates because autos need strong light for 6 to 10 hours a day from week 2 onward. A basic full-spectrum LED panel in a small tent gives far more reliable results.
How much will my first autoflower yield?+
Community reports suggest a first indoor grow typically lands between about 1 and 5 ounces (28 to 140 g) of dried flower per plant depending on light, pot size and strain. Treat anything above that as a bonus, not a benchmark.
Written by the Autoflower.net Editorial Team. Information on this page is educational and does not replace strain-specific breeder guidance. Laws on cannabis cultivation vary by jurisdiction — check your local rules before growing.